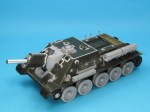


- As expected, the old Tamiya kit is crude by the standards of today. I tried to make as many upgrades as I could, using equivalent parts from the MiniArt kit (stowage boxes, grab handles, tow hooks, fuel drums and attachments, hinges, road wheels, aerial mount, headlight, horn, periscope mounting, saw – basically anything seen in grey plastic in the above pictures).
- Even so, the running gear is very basic – the mounting for the idler wheel is very wrong – but it will mostly be obscured by the wheels, tracks and subsequent accumulated dirt!
- I also used photo etch pieces from the MiniArt kit or from the Eduard set.
- The barrel was a metal replacement by Eduard.
- The fenders were given a rough and uneven appearance along the top by using a Dremel tool on low speed fitted with a sanding wheel.
- The rear fenders were crumpled up somewhat using a pliers, to simulate collision damage. Next time I will remember to do this before they are attached to the vehicle and to anneal all the brass pieces, to make them easier to deform.
- Many weld lines were added by using 0.3 mm diameter plastic rod, softened with Tamiya cement and sculpted with a blade.
- I added extra flame cut edges to some of the end of the engine deck and exhaust covers, as evidenced on real vehicles.
- The road wheels were cut and filed away in places, to represent damage to the rubber.

Leave a comment