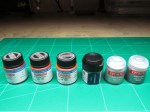
Primer: Tamiya “Fine Surface Primer” spray can
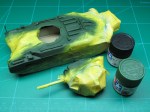
Base coat: A mixture of 80% Tamiya XF-59 “Desert Yellow” and 20% Tamiya X-22 Clear in Tamiya X-20A thinner (ratio 2/3 paint mixture to 1/3 thinner).
Camouflage colour 1: A mixture of 80% Tamiya XF-23 “Light Blue” and 20% Tamiya X-22 Clear in Tamiya X-20A thinner (ratio 2/3 paint mixture to 1/3 thinner).
Camouflage colour 2: A mixture of 80% Tamiya acrylics (ratio 5 parts XF-26 “Deep Green”, 1 part XF-1 “Flat Black”) and 20% Tamiya X-22 Clear in Tamiya X-20A thinner (ratio 2/3 paint mixture to 1/3 thinner).
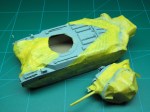
This camouflage scheme – which I believe is called the “Caunter scheme” – necessitated the use of a vast amount of Tamiya masking tape, the progress of which is shown in the pictures. I must confess that about half way through this process I was regretting not selecting one of the simpler Matilda colour schemes! Still, I was pleasantly surprised by the outcome – no paint or small parts torn away by removing the tape. That stuff is awesome. There was a small amount of paint bleed to be corrected. Now, what I ended up with is not remotely demonstration quality, but, viewed from a distance it will look OK! I am also quite sure that it is not exactly how the real scheme looked, in shape or colour. For once, I used exactly the paints which the Tamiya instructions recommended. I was aware that many people think that at least some of these suggested colours are “wrong”, perhaps the result of researching a particular museum vehicle which has been incorrectly repainted. Of course, grossly inaccurate colours are unacceptable but these days I am a little less concerned about matching what is deemed to be the exact base colour. I have in the past painted two tanks with the exact same base colour, only for them to have slightly different appearances in the end, due to differences in weathering. The effect of heavy weathering on the same vehicle is well described here. I must admit that I was not wholly sure how to paint the exhaust pipes emerging from the top of the vehicle and running to the back of it. The moulding on them suggests that they have some kind of covering on the pipes. For now, I have left them as the camouflage scheme, as the Tamiya artwork implies. If I find more convincing reference pictures I may well change it.
Details:
- tools (Vallejo Panzer Aces “Old Wood” 310, Vallejo Model Color “Black” 70950 + Vallejo Model Color “White” 70951 mix, Games Workshop “Chainmail”)
- smoke grenade launchers (Vallejo Panzer Aces “New Wood” 311, Games Workshop “Boltgun Metal”)
- headlights, lamp, mirror (Games Workshop “Mithril Silver”)
- track (Vallejo Panzer Aces “Track Primer” 304, Games Workshop “Chainmail”)
- machine gun (Vallejo Model Color “Black” 70950, Games Workshop “Chainmail”)
- periscopes (Vallejo Panzer Aces “Periscopes” 309)
Pingback: Matilda Mk IIIIV | Skarach's world
Pingback: M3 Stuart “Honey” build – Part 3:Painting | Skarach's world
18/04/2014 at 3:40 pm
I’ve bookmarked this page. In the future I’ll be painting a 3 Blitzkrieg Miniatures Matildas for my Bolt Action 8th Army. Obviously not as detailed as the models you work on and not to your level of skill. But I will try.
It will be a learning curve as I am new to airbrushing and masking.
I also splashed out on Tank Art One and Two, also, FAQ 2 from AK Interactive. Although my focus is painting for wargaming I believe that the skills that military modellers are developing will drag wargames painting forwards(by it’s ears). So these books are rewarding to read.
A couple of questions if you don’t mind.
Who, in your opinion, is a good supplier of 1.48th scale transfers for Allied tanks ie Matildas.
Secondly (please don’t cringe at this) who is a good after market supplier of tools, spades and tank accessories? I’m going to be making a few sci fi armoured vehicles and I want them to look used/lived in.
Many thanks
18/04/2014 at 10:18 pm
Hi. Thanks very much for your kind words. But, having looked at some of your figures I would say that your future Matildas should turn out great! Good luck with airbrushing … I do not consider myself an expert in it but I think that I prefer it to brush work (except for the smallest details). It’s all down to practice I guess. The books you mentioned – I have them too – are great references. The models within are obviously finished to an excellent standard. Having said that, I don’t necessarily like the look of every technique detailed within, but it’s all good to see nevertheless. I have been in the process of upgrading my computer today, so have not had time to find good answers to your questions. I will post back with them tomorrow. Regards and good luck!
19/04/2014 at 11:57 am
Hi, I must say that I am not an expert in 1/48th, having built very few in that scale myself. So, you may know all the below already.
I haven’t found many suppliers of 1/48th scale decals – for example running this search (http://www.hannants.co.uk/search/index.php?product_category_id=&product_division_id=&manufacturer_id=&code=&product_type_id=2977&scale_id=955&keyword_search=&stock=1&setPerPage=25¤cy_id=) on a well known modelling supplier site yields few results. In the past I have bought replacement decals from Archer Fine Transfers (http://www.archertransfers.com/) and Bison Decals (now http://star-decals.net/) – but both as 1/35th.
As for tools and accessories (presumably also in 1/48th?) – again, nowhere near as big a choice as 1/35th, but there are some which I have found: http://www.brengun.cz/e-shop/1-48-accessories-22 (resin fuel cans or various photoetch tools. amongst the aircraft stuff!). One which I have used is http://www.perthmilitarymodelling.com/reviews/48/tamiya/tam32510.htm.
Some 1/48th scale vehicles have the tools moulded on, which I guess limits the after market supplies somewhat.
Good luck!