

Primer: Tamiya “Fine Surface Primer” (light grey) spray can.
Base coats: Using most of the Mr.Hobby Olive Drab modulation set. In all cases the paint was sprayed as a 1:2 mixture in Mr.Color leveling thinner.
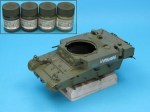
- The darkest colour (“OD shadow” CMC03) was sprayed over the entire model, to act as a dark base.
- The next darkest (“Olive Drab(2)” C38) was sprayed over the bulk of the vehicle, save the deepest recesses.
- “OD highlight 1” CMC01 was sprayed on the upper hull, the sides and top of the turret and the outside part of the wheels only.
- In retrospect, the color looks a bit too green to me for the US olive drab colour. Perhaps I should have used the highlight colour much less, or not at all.
Details:
- Machine guns: Vallejo Model Color “Black” (70950)
- Headlight: Citadel “Runefang Steel”
- Rear lights: Vallejo Model Color “Black” (70950) and “Red” (70947)
- Tools: Vallejo Model Color “Black Grey” (70862), Vallejo Panzer Aces “Old Wood” (310), Vallejo Panzer Aces “New Wood” (311), Vallejo Model Color “USA Olive Drab” (70889)
- Tyres: Vallejo Model Color “Black” (70950)
- Mud flaps: Vallejo Model Color “Black” (70950)
- Tracks: Tamiya “Rubber Black” (XF-85), Tamiya “Dark Iron” (XF-84). Drybrushed with Vallejo Panzer Aces “Dark Rubber” (306) and “Track Primer” (304).
Gloss coat: A 1:2 mixture of Mr.Color “Clear Gloss” (46) and Mr.Color Leveling Thinner was sprayed over the entire model. The decals were applied to the turret and this area resprayed.

Leave a reply to M3 light tank “Stuart” | Skarach's world Cancel reply