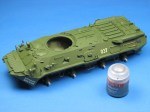
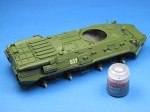
I was a bit unsure how to proceed with chipping. It doesn’t help that I haven’t been able to find many decent pictures or “walkaround” photo albums for this vehicle, unless my internet searching has gone wrong. But the best pictures I found, such as here or here, don’t show huge amounts of paint chipping\scratching\rust – granted that the second photo must be a parade shot. Looking through my library of the Abrams Squad magazine (No.3, October\November 2013, p.51), I came across this in their T-90 build:
“Chipping. This is one of the most difficult steps with modern Russian tanks … The T-90 (and T-80 and T-72) has up to seven different materials under the paintwork, so you have to be very careful if you want to avoid inaccuracies”
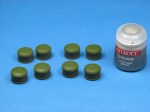
Obviously, I am not dealing with a tank here and it could be that that advice is not relevant and that I making something out of nothing. Point is, I don’t know for sure and in that case I would sooner proceed cautiously. So, it felt wrong to reach for the Vallejo Model Color 70822 (simulating rusted metal after chipping) as I have done for all WW2 armour builds. Were this a two or three colour camouflage (I must be brave enough to try one of those soon!) then I suppose you could attempt paint scratches between the layers. In the event, I thought that it would be viable to add bright metallic chips, using Citadel “Boltgun Metal”, around hatches and well travelled areas (see the BTR-70 build in Abrams Squad, No.2, August\September 2013, p.21) , as visible in the photos referenced above. If I have overdone it in one or two places I think that it will be toned down by subsequent weathering, as I can make full use of washes, streaks and dirt effects.

Leave a comment