
Primer: Citadel “Chaos Black” spray can
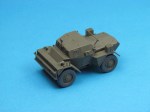
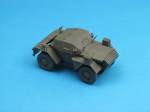
Base coat: A mixture of 90% Tamiya acrylics (ratio 5 parts XF-61 “Dark Green”, 2 parts XF-62 “Olive Drab”, 3 parts XF-3 “Flat Yellow”) and 10% Tamiya X 22 Clear in Tamiya X-20A thinner (2:1 paint mixture to thinner). Even though I subsequently sprayed the highest surfaces with a lightened version of the above mixture it now appears to have been too subtle, as I can see not much gradation in the pictures above! One to remember for the future I think, especially for these smaller scale models, where they can easily become too dark.
I didn’t much like the look of the suggested colour scheme (a green and black “Mickey Mouse” camouflage) so instead went for the above basic green mixture. This meant that to be accurate I couldn’t use the decals provided and as I am not very well set up as a 1/48 vehicle modeller I had no alternatives. So, this is going to look a very generic vehicle in some ways! I do have some stowage items to add and that, together with weathering, will alleviate the monotony a little I hope.
Details:
- Tyres: Vallejo Model Color “Black Grey” 70862
- Mirror: Citadel “Mithril Silver”
- Headlights: Citadel “Mithril Silver”
- Aerial base: Vallejo Panzer Aces “Dark Rubber” 306
- Stowage straps: Vallejo Panzer Aces “Canvas” 314
The paint was protected with a layer of Humbrol Clear gloss varnish, followed by spraying with Citadel Purity Seal satin varnish.

Leave a comment