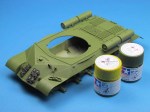

Primer: Tamiya “Fine Surface Primer” (light grey) spray can
Base coat: A mixture of 90% Tamiya acrylics (Tamiya XF-4 “Yellow Green” and Tamiya XF-58 “Olive Green” in a 1:1 ratio) and 10% Tamiya X-22 Clear in Tamiya lacquer thinner (2:1 paint mixture to thinner) was sprayed on. The same mixture, lightened with Tamiya XF-2 “Flat White”, was sprayed on the top of selected parts of the hull and turret (hatches, external fuel tanks). I have plans afoot to ensure that not every Soviet era vehicle to be added to my collection in the future is a base green colour!
Details:
- Tools (handles): Vallejo Panzer Aces “Old Wood” 310
- Tools (metal): Citadel “Boltgun Metal”
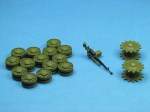
- DShK Machine gun: Vallejo Model Color “Black” 70950, Vallejo Panzer Aces “Leather Belt” 312
- Spare track: Tamiya XF-84 “Dark Iron”
The paint was protected with a layer of Humbrol Clear gloss varnish, the decals applied and glossed over. Finally, Citadel Purity Seal satin varnish was sprayed on.

Leave a comment